Childhood collages
Like many of my generation, whenever I went on holiday as a child with my parents I used to look at a beautiful scene, lift the Instamatic to my eye and be immediately frustrated by the fact that I could not "get it all in". One way I used to try to solve this was to take a series of overlapping pictures, which could then be stuck together at home to give a feeling of the place. Problem is, it never really worked. Just occasionally, it might be possible to get something that gave the right impression, but by and large it never worked very well. Part of the problem was that film always seemed so expensive, so I never took enough pictures. Even when I had my own budget for film, I never took the bull by the horns and took enough pictures to make a worthwhile collage.
Discovering digital panos
Back in 2004-2005, when I was reading the web forums in the run-up to getting my first digital camera, I came across many examples of photographers using stitching methods to create seamless panoramas. The idea of making seamless panoramas grabbed my attention immediately -- it hasn't really let go since.
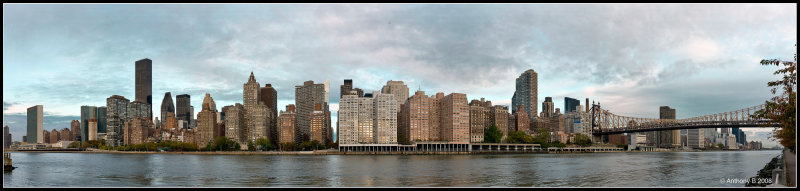
Among others, I really enjoyed the work of a Pbase member rfc: I found his images of New York very inspiring. There is still recurrent a panorama thread running on DPreview, to which I have contributed occasionally over the years. In a completely different style, David Noton’s landscape panoramas are wonderful. Phil and I went to one of his talks about a month ago: seeing the images projected onto a large screen is breathtaking.
An obvious question is why would you need to stitch panos? Wide-angle zoom lenses are common, and we have more megapixels than you can shake a stick at. In this context, why not just crop a wide-angle picture to a panoramic format? Well, of course, and go ahead if it suits the image – Phil recently posted a great example on Flickr.
For me, there is a conceptual difference between deliberately creating a stitched panorama and cropping a conventional wideangle image. Using a wideangle lens is not just about the width of the picture – it is about depth too (hence, you always hear about needing to include some foreground interest). Composing a panorama is a deliberate creative choice just to concentrate on some (often linear) feature and exclude everything else. Starting out with the idea that you are going to move the camera across the scene informs a creative choice in the composition. In any case, unless you carry fisheye lenses, even the widest of normal wideangle zooms may not cover the full width of the pano you might want to make.
There are other consequences too: even though we have no shortage of pixels in modern DSLRs for normal prints (e.g. up to A3 size), stitching can buy extra megapixels should you need them. For instance, a long, thin pano with an aspect ratio of 5:1 to be printed at 12 inches high would need to be 60 inches (5 feet) wide: at 240 dpi that’s over 14000 px on the long side, equivalent to a crop from an image from a conventionally-shaped sensor with 138 Mpx. Sounds an awful lot, but actually not hard to get by stitching multiple 12 Mpx images.
There’s also nothing standing in the way of stitching two-dimensional arrays either: should you need to print an image very large, this can be a viable alternative to buying or renting a vastly expensive high-res camera. No discussion of this can avoid the Gigapan: the ability now to generate images with seemingly infinite zoomability is one of the wonders of the digital age*.
Software for panos
Not long after I bought my first digital SLR, I bought the software package PTGui; it still works extremely well. One of its greatest advantages is the ability to produce a layered PSD file that can subsequently be edited to smooth out awkward transitions. PTGui is still my go-to program for difficult panos. (There is a version for making HDR panos, but I've never used it.)
As Photoshop has matured, so stitching capabilities have been included. The current CS5 is extremely good at producing panos from straightforward overlapping images. However, even though it produces a layered PSD, the editing capabilities of such PSDs are not as great as those from PTGui. By default CS5 only returns the relevant part of the image in each layer. PTGui can be set to return the whole of each layer after warping for incorporation into the pano; the layers are masked off by default above a layer containing the full blended panorama, so this means that by carefully painting on the layer masks it is possible to improve the look. This is particularly useful for people walking through the image who have been cut in half by a join: editing the layer masks in the PSD can usually get all (or none) of them in. This can even be done in very busy areas where a lot of people are constantly moving during the creation of the images.
In general, my first thought is always to use CS5 as the first option for making panoramas; but if there's going to be any kind of a problem with the stitch then I turn to PTGui.
Stitching for when you haven't got the right lens on the camera
When I started out making stitched panoramas it never occurred to me that stitching could be used for more things than wide views. But I now use it surprisingly frequently.
For example, when walking around a city, I often prefer to carry just the D300 body with a single lens. So if I need to go wider than, say, 18 mm on the crop sensor camera, stitching is an easy way to go.
Here is a recent example. At the end of last year, I was in Covent Garden and there was an entertainer putting on a great show while balancing on a ladder. I got behind him with the aim of photographing him with his audience, but found that 18 mm did not include the whole scene. So I took two images, one for the top and one for the bottom half of the picture and stitched them using PTGui. Even though the entertainer was moving quite quickly on his ladder, I was able to get a pretty convincing stitch with just a little painting on the layer masks in the resulting PSD file. (I think it must have been convincing -- it has just been accepted for a competitive exhibition!)
 |
| The Entertainer, Covent Garden, 2010 (produced with PTGui.) |
On our recent trip to Cornwall, I saw some lobster pots on the quay at Padstow. I had the 105 mm lens on at the time: the pots would not quite fit in the frame nicely. Although I had shorter range zooms in my bag, I was reluctant to change lens because there was a lot of dust blowing around in the wind, and in general terms I prefer not to change lenses when there is a likelihood of a load of FOD landing on the sensor. In any case, it was much quicker simply to shoot overlapping shots and stitch them post hoc.
 |
| Lobster pots, Padstow, 2011 (produced with CS5) |
General techniques
Producing stitches from digital image files is extremely easy, but there are a few things to watch out for. Although, technically, one should use a tripod with a panorama head which rotates the lens around the nodal point, mine are all just handheld or on a tripod with a normal ball head.
Two key points: (A) I find greatest success by overlapping each image by about one third to one half and (B) have the camera set completely on manual.
(A) -- Overlapping by a third or so is very easy, but I find it simplest to carefully look in each frame to identify a point which can be moved into the image from the edge. For example on the right-hand side of the first image that might be a tree: for the second image, move that tree about one third of the way across the frame. When panning the camera, be sure to stay in one place, and as far as possible, just rotate the top half of your body, keeping the camera to your eye all the time. It is also worth rehearsing the pano before taking the first one to make sure that everything you want will fit. Remember that stitching will give large files, so don’t be afraid of framing relatively loosely and then cropping afterwards. It often useful to hold the camera in portrait format when producing horizontal panoramas, so the lens cam be zoomed in as far as possible, giving the greatest resolution in the resulting pano.
(B) -- Successful stitches can only be achieved if the basic setup of each image is the same. Shutter speed, aperture and ISO settings must be the same all the way across, so set exposure to manual mode (M) on the camera. There's two viable approaches to determining exposure, the laborious and the easy. The laborious way is to take a series of spot readings across the scene and determine an optimal exposure accordingly. I usually choose the easy method: in this, exposure is chosen based matrix readings of what I consider to be the most important part of the scene, and then checking that any brighter parts of the scene are not blown. My aim is to get a zero-adjustment raw file for the most important part, and then - providing highlights are held - not worry about the rest. There is enough latitude in a 14 bit raw file that subsequent adjustment of the stitched image (which becomes a 16 bit TIFF or PSD file) that most usable scenes will work this way.
It is also important to have a consistent white balance throughout. On auto white balance if you are moving the camera so that one area of the final stitch is dominated by shade and another area is dominated by bright sunlight, there is a danger that the camera will change white balance between shots. For daylight panos I usually put the camera on 5260 K, which is roughly a daylight setting. (Incidentally, David Noton recently produced a very good piece on white balance for landscape photography, in which he argues that fixed daylight white balance is, in any case, better than auto white balance for landscapes).
Neutral density graduated filters work well with wide panos if the sky needs to be kept on scale. On the other hand, polarizing filters can be problematic since they don't give a constant darkening of the sky across a wide view.
One question that often arises is whether to have focus fixed. Normally, I'll set an aperture to give a depth of field that is sufficient for the scene, and choose a single focus point and then turn off auto focus once that is set. Occasionally, that won't work because the subject or field of view contains more depth than can be encompassed in a single aperture. On these occasions, it is possible to get a fully focused pano by moving the focus point with the camera, providing depth of field, as well as field of view, overlaps.
The great thing about panoramas is that they can be produced from any digital camera, even from a camera on a phone. Some of the latest compact cameras even come with built-in mechanisms for generating a panorama automatically when the camera is swiped around. So, if you have not tried it, give it a go! If you have not got a current version of Photoshop, PTGui offers a free trial. There are many free software packages as well which I have not tried, so I can't give any recommendation, but you might try searching for panorama stitching software. Have fun!
---------------


